Showing posts with label visual studio. Show all posts

Friday, August 13, 2010

Will the real 'PHI' symbol please stand up?

In my last post SolidWorks Hole Size and Extended ASCII codes I had mentioned that I needed to input the 'PHI' symbol when creating a Wizard Simple Hole in SolidWorks using the SolidWorks API for Visual C++.

Well it turns out that while my mind was in the right place, I probably should have taken that left turn at Albuquerque. So lets revisit that topic again. It seems that using Extended ASCII codes for this job was the wrong solution, though it did lead me to find out more about specifying symbols using Unicode, since I figured that I need to specify the PHI symbol using Unicode.

So now the questions are "what is the Unicode character for the PHI symbol?" and "how do we specify that character in C++"?

Lets answer the more difficult of the two questions first, which is what this post is all about.

What is the Unicode character the PHI symbol?
Well turns out that there are numerous ways to express the same symbol (at least they are the same in that they are all called PHI). Here are a few Unicode characters that MS Windows recognizes as PHI symbols:


So which one is the one we need? Well its the last one. Why? Because thats the only one that SolidWorks will accept and create a hole with and the only one that looks like the Mathematical symbol PHI (Ø - see note below). The rest may look like PHI but they are not the Real McCoy.
Now that we have the Unicode character to use, comes the easier question:
How do we specify Unicode characters in C++?
Surprisingly the answer is similar to specifying Extended ASCII codes. Instead of using a "\x" we simply use a "\u". Here is what it looks like:
CComBSTR size(L"\u00D80.15");
Breaking it down:
  1. The "L" is to specify that this is Unicode.
  2. The "\u" is to specify Unicode characters in literal strings
  3. And as we saw as the answer to the first question, the "00D8" (thats ZeroZeroD8) is the PHI symbol
  4. The trailing 0.15 is simply a size that SolidWorks Hole could have
  5. BUT unlike Extended ASCII we can specify the non-Unicode portions of the string literal, using regular characters i.e. the "0.15" part.
I guess we learn something new everyday.

So do you use Unicode characters in your literal strings often? What method do you use to find the right code? Let me know.

NOTE:
IF YOU CAN'T SEE THE PHI SYMBOL ITSELF 
AT THE SPECIFIED LOCATION THEN YOUR BROWSER DOESN'T UNDERSTAND UNICODE CHARACTERS. TO FIX THIS PROBLEM GET A BETTER BROWSER.

Monday, February 02, 2009

Writing CEEFIT class like a regular C++ class

FIT / CEEFIT?
If you need to write integrated tests that can take a table specifying input data and expected output data, and run the tests in a batch, then you should consider Fit: Framework for Integrated Test. If you develop applications with C++, then look to CEEFIT to satisfy your FIT needs.

CEEFIT is well documented, flexible and an excellent integrated test framework. In most cases you can use the Macro method to create your test-classes, but CEEFIT also provides a way to create test-classes manually from scratch. This second 'manually from scratch' method is what this post talks about.

Why would you want to write CEEFIT classes from scratch?
Well one reason for me was to ensure that I could still use Doxygen to document the classes and their methods and parameters i.e. make the code-documentation doxygen-visible. I have not been able to figure out how to have the documentation be doxygen visible when using the macros.

How to write CEEFIT class from scratch?
The example posted on CEEFIT's website is excellent and provides everything you need, but I found it a little too much. I simply wanted to write a class that inherits from COLUMNFIXTURE that looks like a regular C++ class - I did not want to mess with TABLE or DoRows(). Turned out to be very simple to do and here it is:

TestSWX.h
namespace swx_ceefit {
/** A CEEFIT class created from scratch without macros to test batch-mode processing of SWX API cases.
        \author GRI
        \date Dec 1 2008
    */
    class TestSWX :
        public CEEFIT::COLUMNFIXTURE
    {
    public:
        inline ceefit_init_spec TestSWX();
        inline virtual ceefit_dtor_spec ~TestSWX();
    private:
         ceefit_init_spec TestSWX(const TestSWX&);
         TestSWX& ceefit_init_spec operator=(const TestSWX&);
        /** fit_var
        */
        CEEFIT::STRING m_sldprt_name;
        /** fit_test
        */
        double ceefit_call_spec nos_feats();
        /** where is this executable executing from?
        */
        void ExecutingPath();
        /** Get the full path to the input file i.e. the *.sldprt file
            \author GRI
            \date Jan 8 2009
        */
        void GetFullPath(std::wstring & wsFullPath);
    };
 }

TestSWX.cpp
CComPtr swApp;

namespace swx_ceefit
{
    ceefit_init_spec TestSWX::TestSWX()
    {
        RegisterCeefitField(this, "sldprt_name", m_sldprt_name);
        RegisterCeefitTest(this, "nos_feats", &TestSWX::nos_feats);

        //cout << endl << "constructing";
    }

    ceefit_dtor_spec TestSWX::~TestSWX() {
        //cout << endl << "destructing";
    }

    double ceefit_call_spec TestSWX::nos_feats() {
        ExecutingPath();
        wstring wsFullPath;
        GetFullPath(wsFullPath);
        if( swApp ) {
            IModelDoc* swModel = NULL;
            if( swApp->put_Visible(FALSE) == S_OK ) {
                if( swApp->DocumentVisible(FALSE, swDocPART) == S_OK ) {
                    //wcout << "\nfull path in nos_feats = " << wsFullPath.c_str() << endl;
                    CComBSTR sFileName(wsFullPath.c_str());
                    CComBSTR sDefaultConfiguration(L"Default");
                    long fileerror;
                    if( swApp->IOpenDocSilent(sFileName.m_str, swDocPART, &fileerror, &swModel) == S_OK ) {
                        if( swModel != NULL ) {
                            IPartDoc *part;
                            HRESULT hres = swModel->QueryInterface(IID_IPartDoc, (LPVOID *)&part);
                            if( swModel->put_Visible(FALSE) == S_OK ) {
                                CComPtr swfeat;
                                if( part->IFirstFeature(&swfeat) == S_OK ) {
                                    CComBSTR name;
                                    swfeat->get_Name(&name);
                                   
                                    wcout << endl << "1st feat name = " << name.m_str;
                                    swModel->Quit();
                                } else wcout << endl << "no first feature";
                            } else wcout << endl << "swModel still visible";
                        }
                        else {
                            wcout << endl << "swModel = NULL with fileerror = " << fileerror;
                        }
                    } else wcout << endl << "open doc not silent";
                } else wcout << endl << "document still visible";
            }
        }
        else wcout << endl << "ERROR: swApp = NULL" << "\tfile\t=\t" << __FILE__ << "\tline\t=\t" << __LINE__;
        VARIANT_BOOL ret;
        swApp->CloseAllDocuments(TRUE, &ret);
        return 1;
    }

    void TestSWX::ExecutingPath() {
        wchar_t sExecPath[MAX_PATH];
        GetModuleFileName(NULL, sExecPath, MAX_PATH);
        //wcout << endl << "executable = " << sExecPath;
    }

    void TestSWX::GetFullPath(wstring & wsFullPath) {
        wchar_t cFullPath[MAX_PATH] = TEXT("");
        LPTSTR  lpszFilePart = NULL;
        GetFullPathName(m_sldprt_name.GetBuffer(), MAX_PATH, cFullPath, & lpszFilePart);
        //wcout << endl << "full path = " << cFullPath;
        wsFullPath = cFullPath;
    }

    static REGISTERFIXTURECLASS< TestSWX > FatTableFixtureRegistration("swx_ceefit::TestSWX", "AKA_TESTSWX"); 


Conclusion
If you are wondering why this class is called TestSWX (SWX = short for SolidWorks), then consider this: using the solution from a previous post of mine "Batch mode SolidWorks" we can start SolidWorks without GUI and using the above CEEFIT class, call SolidWorks API and run your integrated tests. But that my readers is possibly a separate post.

Thursday, December 04, 2008

Office 2003 Addin using Visual Studio Add-in (Extensibility) Project

A while back I had to write an add-in to Microsoft Office 2003 for a client and ran into numerous issues during both the development and the deployment of the add-in. Thought I should post it here in hopes that someone may find it useful.

I use Visual Studio 2005 Standard (I know, I know Visual Studio 2008 is out but I develop Pro/Toolkit and SolidWorks API applications too and am not sure if the upgrade is a simple recompile and link, so have not upgraded.), so in order to develop Microsoft Office 2003 Add-ins I had two options:

  • Use the Visual Studio Add-in Template under the "Extensibility" Project Type.
  • Use Visual Studio 2005 Tools for Microsoft Office 2003 (VSTO)
There is a good comparison of these two choices at CodeProject. I have a few additional points to note here that may influence your choice:
  • Using Visual Studio Add-in Template
    • DEVELOPMENT: Writing code for the add-in gets very clunky. The following is a sample excerpt:
      using Microsoft.Office.Core;
      using nsWord = Microsoft.Office.Interop.Word;

      nsWord.ApplicationClass office_app;

      public void OnConnection(object application, Extensibility.ext_ConnectMode connectMode, object addInInst, ref System.Array custom)
              {
                  applicationObject = application;
                  addInInstance = addInInst;
                  if (connectMode != Extensibility.ext_ConnectMode.ext_cm_Startup)
                  {
                      OnStartupComplete(ref custom);
                  }
                  /// which office app is "application"
                  ///
                  if (application is nsWord.Application)
                  {
                      office_app = (nsWord.ApplicationClass)application;
                      //if (logger.IsInfoEnabled) { logger.Info("host app is Word"); }
                  }
              }

      As can be seen from the last few lines, to determine the Office Application that the add-in is loaded in is an equivalence test (using if-else or switch-case or some similar). I know this is not a good solution, but I don't have anything better (if someone has a better suggestion I would really appreciate the tip.

      Even if I got beyond that I am still casting the 'object application' to 'Microsoft.Office.Interop.Word'. I guess I could have used inheritance to pass 'application' to a sub-class that would deal with the specific Office Application, but I was surprised to find that you could not simply query for the Office App Type.
    • DEPLOYMENT: Deploying the Shared Add-in requires a bunch of updates from Microsoft that have to be applied to the target PC:
I have not had a chance to write code with VSTO, but considering that it was designed for such applications, I am assuming that you will not have most of the weirdness stated here. If you have Visual Studio 2005 Professional, then you can download VSTO here [3]. You can search on Microsoft's Download center for respective versions of VSTO for VS 2008 (for Microsoft Office 2003/2007).

Acknowledgements:
  1. http://social.msdn.microsoft.com/forums/en-US/vsto/thread/10c10162-4841-4b46-9d54-67adfecbf622/
  2. http://msdn.microsoft.com/en-us/library/kh3965hw(VS.80).aspx
  3. http://www.microsoft.com/downloads/details.aspx?FamilyID=8315654b-a5ae-4108-b7fc-186402563f2b&DisplayLang=en

Thursday, April 10, 2008

Batch mode SolidWorks

I saw a post on Google Groups where a user had posted a question (2 years ago) asking how one could open SolidWorks silently viz. no GUI and use SolidWorks APIs to open a part but there was no answer that I could find right of.

In the same vein as my previous post titled "Batch mode Pro/Engineer" I tried to create a similar workspace for SolidWorks that executes SolidWorks with no GUI but still uses the SolidWorks API to load and query parts or assemblies. Fortunately SolidWorks API makes it much easier to do this as compared to Pro/Toolkit. After a little experimentation I came up with the following solution. The solution was created in Visual Studio 2005 using Visual C++. Click on the following zip file to download the solution.


http://ossandcad.googlecode.com/files/swbatch.zip


If you prefer to download from the source, you can do so using the following link with your SVN client (e.g. TortoiseSVN (follow the instructions at http://code.google.com/p/ossandcad/source/checkout)):


https://ossandcad.googlecode.com/svn/trunk/swbatch


Setup of Solution
Simply create a new "Win32 Console Application" project in Visual Studio 2005.


Edit the project's properties and add the following directory to the "Additional Include Directories" under "Configuration Properties"->C/C++->General:

"c:\program files\solidworks\samples\appcomm\win32\"


You should have a "cpp" file named swbatch.cpp (or something similar depending on the name you selected for the console application). Open that file and add the following code to it above the main() (or _tmain()) function.
#include "iostream"
#include "objbase.h"
#include "atlbase.h"

//Import the SolidWorks type library
#import "C:\Program Files\SolidWorks\sldworks.tlb" raw_interfaces_only, raw_native_types, no_namespace, named_guids
//Import the SolidWorks constant type library
#import "C:\Program Files\SolidWorks\swconst.tlb" raw_interfaces_only, raw_native_types, no_namespace, named_guids
Then modify your main() (or _tmain()) function to look like the source code included in the zip file. I apologize for not posting the code directly into the body of this post, but Blogger was messing up the formatting.

Make the following changes to the code in main():

  • Make sure you have a SLDPRT file in the location stated above instead of "C:\\swbatch\\Debug\\camtest.sldprt". Change the path to which sFileName points to, to coincide with your true path.
Build the solution and execute it. The console application will startup and silently load SolidWorks. If you have Windows Task Manager open then you will see SLDWORKS.exe running. If the SLDPRT is found in the right location, then the code above reads the SLDPRT and throws a MessageBox with the name of the first feature of the SLDPRT, which in this case is "Annotations". After the program exits, SolidWorks exits too.

Note:
Please keep in mind the following points about the code in main() in the zip file
:
  • I first tried to use OpenDoc6 as follows:


    • swApp->OpenDoc6(L"C:\\cygwin\\home\\ganesh\\downloads\\imagecom\\batch\\camtest.sldprt", swDocPART, swOpenDocOptions_Silent, L"Default", &fileerror, &filewarning, &swModel)
  • By doing that, SolidWorks started up with its GUI and then tried to load the model, which was not what we wanted. Next I tried an old API OpenDocSilent() as follows:


    • swApp->IOpenDocSilent(sFileName, swDocPART, &fileerror, &swModel)
  • This had the required effect of opening SolidWorks silently and loading the model in it.
  • The other big problem I noticed was: IF YOU LOAD A READ-ONLY SLDPRT INTO SOLIDWORKS USING OPENDOCSILENT(), FOR SOME REASON SOLIDWORKS STARTS UP WITH GUI. The only solution I have for this at the present is to not load read-only parts or assemblies.
If you found this article useful, please let me know. It helps me identify which posts, my readers prefer.

UPDATE: THE POST WAS UPDATED ON AUGUST 3RD 2009 TO REPLACE THE DOWNLOAD LINK FOR SWBATCH.ZIP. PREVIOUSLY SWBATCH.ZIP WAS SERVED FROM BOX.NET. IT IS NOT BEING SERVED FROM GOOGLECODE.

Wednesday, March 26, 2008

HOWTO: Example Pro/Toolkit Application using Visual Studio 2005

In my previous post titled "Example ProTookit Application using Visual Studio 2005" I received a comment asking to explain how I created the sample workspace (Pro/Toolkit Application using Visual C++ 2005) which can be downloaded by clicking the file below:


http://ossandcad.googlecode.com/files/ProToolkitVisualCpp.zip


I should point out that the workspace that is attached above, while it is currently in Visual Studio 2005 format, came initially from Visual Studio 2002 (or known as Visual Studio.NET) and my colleagues and I regularly updated the workspace in current versions of Visual Studio.

In this post I try and explain the steps I used to create a sample workspace from scratch in Visual Studio 2005 for Pro/Toolkit applications. For more details (although with some mistakes some of which I will list in future posts) refer to "tkuse.pdf" in "C:\Program Files\proeWildfire 3.0\protoolkit".

I break the process down into following steps:

Creating the Visual Studio 2005 solution

The easiest method I know of to create a Pro/Toolkit Application in Visual Studio 2005 (that matches the above workspace) is to start with an Empty Project. Name it "proe" for example.

Add a file named "main.cpp".

Add the following code to "main.cpp"

#include <windows.h>

#include <protoolkit.h>
#include <procore.h>

/** Make sure to call ProToolkitMain passing the arguments passed into main
*/
extern "C" int main(int argc, char **argv)
{
ProToolkitMain(argc, argv);
return 0;
}

/** Required entry point for Pro/Toolkit
*/
extern "C" int user_initialize()
{
MessageBox(NULL, "Pro/Toolkit App", "proe", MB_OK);
return 0;
}

extern "C" void user_terminate()
{
return;
}
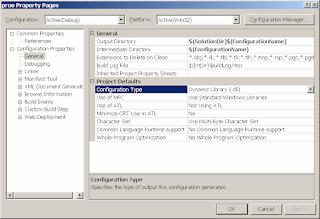
Change the "Configuration Type" to "Dynamic Library (.dll)".

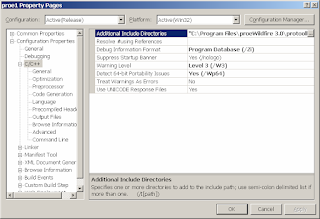
Add the relevant include folders for Pro/Toolkit ("C:\Program Files\proeWildfire 3.0\protoolkit\includes";"C:\Program Files\proeWildfire 3.0\prodevelop\includes").

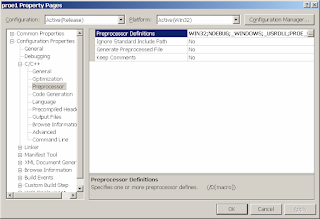
Add the following pre-processor definitions (WIN32;NDEBUG;_WINDOWS;_USRDLL;PROE_PROJ_EXPORTS;PRO_MACHINE=29; PRO_OS=4;hypot=_hypot;MSB_LEFT;far=ptc_far;huge=p_huge;near=p_near;_X86_=1)

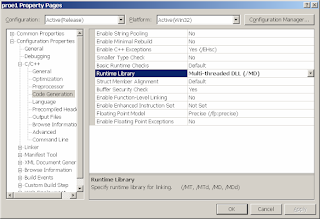
Make sure for the Runtime Library you are using "Multi-threaded DLL (/MD)" or the "Multi-threaded Debug DLL (/MDd)" based on whether you are using "Release" or "Debug" configuration respectively.

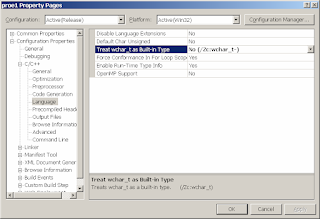
Make sure that the "Treat wchar_t as Built-in Type" is set to "No (/Zc:wchar_t-)".


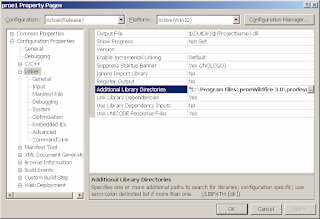
Add the relevant Pro/Toolkit and Pro/Develop library folders ("C:\Program Files\proeWildfire 3.0\prodevelop\i486_nt\obj";"C:\Program Files\proeWildfire 3.0\protoolkit\i486_nt\obj").

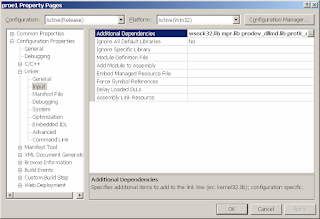
Add the "Additional Dependencies" (wsock32.lib mpr.lib prodev_dllmd.lib protk_dllmd.lib psapi.lib)

Do a Rebuild and make sure you have a DLL named "proe.dll" in a sub-folder named Debug or Release depending on your build configuration.

Creating the Pro/Toolkit application files and message files

Pro/Engineer loads Pro/Toolkit applications using a registration file named "protk.dat" in the Debug AND Release folder. You need to create a protk.dat file for the Pro/Toolkit DLL that you created using the workspace above. While developing and testing the Pro/Toolkit application I use the following "protk.dat":
NAME proe
EXEC_FILE proe1.dll
TEXT_DIR ..\text
STARTUP DLL
allow_stop TRUE
revision Wildfire
END

The "protk.dat" is pretty easy to understand although it would have helped if Pro/Engineer used a more standard method such as the Windows Registry (although that may not work since Pro/Engineer is multi-platform). The main variables you need to be aware of are:
  • TEXT_DIR - The value for this variable is "..\text". This means you need to create a sub-folder named "text" under your main folder. In the "text" folder create a text file named "menu.txt". The "text" folder and the text file "menu.txt" (the name can be changed but I don't delve into that in this post) are Pro/Engineer's bizarre method to enable localization. The "menu.txt" file looks something like the following:
USER %0s
%0s
#
#
MenuLabel
Menu
#
#
PushButton
PushButton
#
#
It simply lists the label that is seen by the Pro/Toolkit application and its corresponding value. Most Visual C++ developers use either a String Table or other sort of Resource. If you think this is weird, I think it may have something to do with Pro/Engineer supporting multiple Operating Systems.
  • STARTUP - For the example provided the type is "DLL".
Execute Pro/Engineer and load the Pro/Toolkit Application

While developing and testing your Pro/Toolkit application I use the following method:
  • Create a shortcut to "C:\Program Files\proeWildfire 3.0\bin\proe.exe" in your Pro/Toolkit's "Debug" or "Release" folder.
  • Make sure the "Start in" text box for this shortcut remains empty which means that this shortcut will start Pro/Engineer in the current folder and will automatically load the DLL specified in protk.dat located in the same folder.
  • Double click the shortcut you created to run Pro/Engineer. If you get a message box with the text "Pro/Toolkit App" then IT WORKED. REJOICE.

If the method in the above post did not work for you, you can also download the ZIP file I have provided and try that out. If you need more help, post a comment and I will try to provide more information.

Thursday, February 14, 2008

Example ProTookit Application using Visual Studio 2005

PTC has been offering an Application Programming Interface (API) for Pro/Engineer for many years now and I have seen an article or two or three online that shows you how to develop Pro/Toolkit applications using Visual C++. These are very useful and if you navigate to the bottom of the page on article three then you will find a few zip files that you can download and start working with Visual C++ and Pro/Toolkit quickly. There is even a site that sells you tutorials on how to develop Pro/Toolkit applications. Of course I have never purchased any such tutorials so am unable to recommend them.

Interestingly very little outside help is available on developing Pro/Toolkit Applications using Visual C++. Simply Googling for Pro/Toolkit help is of very very little help. So what is a Pro/Toolkit developer to do?

In an effort to help other Pro/Toolkit developers who are using Visual C++ 2005 I have attached a zipped workspace created in Visual Studio 2005. This zipped workspace allows you to create a DLL that creates a Menu in the Pro/Engineer interface. Please use this workspace as a starting point - it is not by no means the perfect workspace (for example I currently put the menu.txt in two locations - which is not the most efficient way to do it). This workspace was created and donated by a colleague of mine, Amar Junankar (although I had created a similar workspace and have kept it updated for many years).


http://ossandcad.googlecode.com/files/ProToolkitVisualCpp.zip


If you notice carefully in the workspace (after unzipping) in both the "debug" and "release" sub-folders there is a batch file named "Start_ProE_Here.bat". What this batch file does is start Pro/Engineer (default location of "C:\Program Files\proeWildfire 3.0\bin\proe.exe") from the "debug" or "release" (viz. current) sub-folder. This ensures that the protk.dat (which Pro/Engineer uses to register Pro/Toolkit applications) is loaded on startup of Pro/Engineer thus enabling our Pro/Toolkit application. Of course before starting this batch file, please do a build of both debug and release configurations.

As a side note: In my next post I will add to this workspace the necessary lines of code that will allow a developer to call .NET assemblies from within the Pro/Toolkit Application.

If you need any help please post a comment and I will try to help as much as I can.