Thursday, December 04, 2008

Office 2003 Addin using Visual Studio Add-in (Extensibility) Project

A while back I had to write an add-in to Microsoft Office 2003 for a client and ran into numerous issues during both the development and the deployment of the add-in. Thought I should post it here in hopes that someone may find it useful.

I use Visual Studio 2005 Standard (I know, I know Visual Studio 2008 is out but I develop Pro/Toolkit and SolidWorks API applications too and am not sure if the upgrade is a simple recompile and link, so have not upgraded.), so in order to develop Microsoft Office 2003 Add-ins I had two options:

  • Use the Visual Studio Add-in Template under the "Extensibility" Project Type.
  • Use Visual Studio 2005 Tools for Microsoft Office 2003 (VSTO)
There is a good comparison of these two choices at CodeProject. I have a few additional points to note here that may influence your choice:
  • Using Visual Studio Add-in Template
    • DEVELOPMENT: Writing code for the add-in gets very clunky. The following is a sample excerpt:
      using Microsoft.Office.Core;
      using nsWord = Microsoft.Office.Interop.Word;

      nsWord.ApplicationClass office_app;

      public void OnConnection(object application, Extensibility.ext_ConnectMode connectMode, object addInInst, ref System.Array custom)
              {
                  applicationObject = application;
                  addInInstance = addInInst;
                  if (connectMode != Extensibility.ext_ConnectMode.ext_cm_Startup)
                  {
                      OnStartupComplete(ref custom);
                  }
                  /// which office app is "application"
                  ///
                  if (application is nsWord.Application)
                  {
                      office_app = (nsWord.ApplicationClass)application;
                      //if (logger.IsInfoEnabled) { logger.Info("host app is Word"); }
                  }
              }

      As can be seen from the last few lines, to determine the Office Application that the add-in is loaded in is an equivalence test (using if-else or switch-case or some similar). I know this is not a good solution, but I don't have anything better (if someone has a better suggestion I would really appreciate the tip.

      Even if I got beyond that I am still casting the 'object application' to 'Microsoft.Office.Interop.Word'. I guess I could have used inheritance to pass 'application' to a sub-class that would deal with the specific Office Application, but I was surprised to find that you could not simply query for the Office App Type.
    • DEPLOYMENT: Deploying the Shared Add-in requires a bunch of updates from Microsoft that have to be applied to the target PC:
I have not had a chance to write code with VSTO, but considering that it was designed for such applications, I am assuming that you will not have most of the weirdness stated here. If you have Visual Studio 2005 Professional, then you can download VSTO here [3]. You can search on Microsoft's Download center for respective versions of VSTO for VS 2008 (for Microsoft Office 2003/2007).

Acknowledgements:
  1. http://social.msdn.microsoft.com/forums/en-US/vsto/thread/10c10162-4841-4b46-9d54-67adfecbf622/
  2. http://msdn.microsoft.com/en-us/library/kh3965hw(VS.80).aspx
  3. http://www.microsoft.com/downloads/details.aspx?FamilyID=8315654b-a5ae-4108-b7fc-186402563f2b&DisplayLang=en

Thursday, September 18, 2008

License needed to run my Pro/Toolkit add-ins

I received a comment on an older post of mine HOWTO: Example Pro/Toolkit Application using Visual Studio 2005 from Hans who mentioned that he was unable to run my Pro/Toolkit add-in that was attached with that post. (For convenience the following is the same attachment)


The specific error he received was:

The Pro/TOOLKIT application "ProE_Proj" was not unlocked before distribution to your site.
Please contact the provider of "ProE_Proj" for assistance.
This error is the result of a lack of a Pro/Toolkit license on the PC on which you are deploying my add-in.

Reason for Error
I intended this blog for developers of Pro/Toolkit, SolidWorks and other CAD API applications. So the assumption I make is the availability of the required developer license on the PC where these applications are to be developed. The Visual Studio project and source code that I post are not intended for deployment on end-user PC. I do not pay for a Pro/Engineer or Pro/Toolkit license myself. So do not have the rights to distribute the binary executable code (either DLL or EXE). In order to use my add-ins on an end-user PC you will need to have a Pro/Toolkit or SolidWorks license, as applicable.

Solution
 To deploy a Pro/Toolkit add-in (e.g. to deploy my ProE_Proj on a PC without Pro/Toolkit license) follow these steps:
  • From a development workstation which has Pro/Toolkit license execute the following command:
C:\Program Files\proeWildfire 3.0\i486_nt\obj\protk_unlock.exe 'one or more pro/toolkit dll or exe names '
  • Once unlocked you can deploy the add-in to end-user PC without them needing Pro/Toolkit license on their PC. To learn how to write installers to deploy your add-in, refer to my last post Pro/Toolkit Add-in registration.
Still problems?
If you are still having problems with development or deployment of the Pro/Toolkit add-in, then post a comment and I will respond with a solution if I have one.

Monday, September 08, 2008

Pro/Toolkit Add-in registration

In one of my previous posts HOWTO: Example Pro/Toolkit Application using Visual Studio 2005 I described how to create protk.dat files necessary to enable Pro/Engineer to discover your Pro/Toolkit add-ins. In that post the protk.dat file was placed in the same path as your executable. This simplified your development and debugging process.

But once you are done with all development and want to package your add-in for delivery to the customer you can leave the protk.dat in the same location as your add-in unless you plan to put your executable in the Pro/Engineer directory - which is the worst thing you can do.

So where should you put your protk.dat file? Well the tkuse.pdf (found under C:\Program Files\proeWildfire 3.0\protoolkit) gives the following advice to Pro/Toolkit developers.

Pro/ENGINEER searches for the registry file as follows:
  • In the absolute path specified in the “PROTKDAT”, “PRODEVDAT”, and “TOOLKIT_REGISTRY_FILE” statements in the Pro/ENGINEER configuration file.
  • For the files named protk.dat or prodev.dat in the following locations:
  1. Current directory
  2. < Pro/ENGINEER >/< MACHINE >text
  3. < Pro/ENGINEER >/text
In the preceeding locations, the variables are as follows:

  • < Pro/ENGINEER >—The Pro/ENGINEER loadpoint (not the Pro/TOOLKIT loadpoint).
  • < MACHINE >—The machine-specific subdirectory (such as sgi_elf2 or i486_nt).
If more than one registry file having the same filename exists in this search path, Pro/ENGINEER stops searching after finding the first instance of the file and starts all the Pro/TOOLKIT applications specified in it. If more than one registry file having different filenames exist in this search path, Pro/ENGINEER stops searching after finding one instance of each of them and starts all the Pro/TOOLKIT applications specified in them.
Note:

  • Option 1 is normally used during development, because the Pro/TOOLKIT application is seen only if you start Pro/ENGINEER from the specific directory that contains the registry file.
  • Option 3 is recommended when making an end-user installation, because it makes sure that the registry file is found no matter what directory is used to start Pro/ENGINEER.

So according to PTC we should put our protk.dat files in the < Pro/ENGINEER >\text folder which is typically C:\Program Files\proeWildfire 3.0\text.

Be careful
Do not overwrite the protk.dat file in the < Pro/Engineer >\text folder as other add-ins may have appended their protk.dat registry file into that file. Append your protk.dat to the protk.dat file in the < Pro/ENGINEER >/text folder. Also when uninstalling take care to not delete the protk.dat files, as that would disable other add-ins. Simply delete the lines in that protk.dat file that you wrote during installation of your add-in. NOTE: Do not just make a copy of the protk.dat in< Pro/ENGINEER >\text folder to a temporary location during installation and then replace it when uninstalling your application. This will disable Pro/Toolkit applications installed after your own.

So what should be done and How to do this?
To summarize we need to achieve the following to register and deregister the Pro/Toolkit addin with Pro/Engineer upon installation and uninstallation respectively:
  1. On install append the add-ins registration information to the protk.dat file in < Pro/ENGINEER >\text
  2. On uninstall delete the lines of text we appended to the protk.dat file in < Pro/ENGINEER >\text
I personally use the NSIS scriptable install to create Pro/Toolkit applications. NSIS is an open source system to create Windows installers. If you use NSIS then the following tips should help you to address the above requirements.
    • INSTALLATION:
      • Create a section, named something like "AppendProTKDAT".
      • Call FileOpen in "append" mode
      • Call FileSeek with "offset" at "0" with "END" mode - This is very important, since FileOpen always positions the file's cursor at the beginning of the file. We want to append our protk.dat registry lines to the end of the file - So basically call after FileOpen
        FileSeek $0 0 END
      • Call FileWrite repeatedly to write the various lines
                FileWriteByte ${FilePathName} "13"
                FileWriteByte ${FilePathName} "10"
                ; Carriage Return / Line Feed
                FileWriteByte ${FilePathName} "13"
                FileWriteByte ${FilePathName} "10"
                FileWrite ${FilePathName} "NAME             ${name_of_prod}"
      • Call FileClose
    • UNINSTALL
      • To delete the lines of text we appended to the protk.dat file call RemoveAfterLine as specified in the following NSIS Function (note: this is a user contributed Function).
      • So in my case I called it as follows (the $\r$\n is for "new line"):
        Push "NAME             ${PRODUCT_NAME}$\r$\n" ;(here ${PRODUCT_NAME} is something I have defined at the beginning of the script to be the name of my product, as written to the protk.dat)
        Push "END$\r$\n"
        Call un.RemoveAfterLine

A Few Gotchas
While creating the installer with NSIS I ran into a weird problem. During install/uninstall with the NSIS-created installer, the protk.dat file would get appended to properly but for some reason the permissions on the file would change from "readable by Users" to "readable by Administrator only". Since I could not find a fix or a mention for this on NSIS' website I fixed it as follows:
  • On Windows XP (and possibly other Windows OS too) call "CACLS.EXE" as follows during install and uninstall -
    ExecWait '"$SYSDIR\cmd.exe" /C echo Y|$SYSDIR\cacls.exe "${PROTKDAT_INSTALL_DIR}" /G everyone:R administrators:f' $0
  • The "echo" part is required since CACLS.EXE requires user input at the command prompt for a "Y" or an "N". So with the "echo" we are simply replicating that behavior.
    Comments?
    I am not attaching the source code directly, as I have not found a generic way to present my NSIS code without making it very application specific. If the sample stuff I have posted above is not enough, leave a comment for me and I will post whatever you need after stripping application-specific strings and code.

    Monday, May 05, 2008

    Pro/Toolkit, SolidWorks API Development Tools (C++ Episode)

    Continuing the topic I started discussing in my last post with Visual C++ and Pro/Toolkit development tools.

    Remember you can use TortoiseSVN with any file type (does better with text, since merging is possible with text files), so I don't mention it separately here.


    Visual C++
    Logging Tools:
    Pantheios
    Logging in Visual C++ is unfortunately not the easiest tool to find. There are many that pop up e.g. Log4Cpp, Log4Cplus, log4cxx etc. but I was not able to build any of these successfully. So I finally turned to Pantheios and found it as easy to use as NLog though the configuration is quite different and is not done through configuration files like NLog. You have to build the Pantheios libraries yourself, so don't forget to refer to the Pantheios Library Selector Tool to make sure you use the right libraries with your code.

    Now keep in mind that Pantheios describes itself as a logging API rather than a logging tool meaning it does not have the choice of targets that NLog provides (of course there is no NLog for pure C++, only in mixed managed/native mode). So Pantheios allows you to write to files on your hard disk and thats it. For more target choices you need to add one of the previously mentioned logging tools (viz. log4cpp, log4cplus or log4cxx) into the mix. But I have found no need to do so. I use the stock back and front ends that come with Pantheios and write my log messages to a file on the hard disk.

    Pantheios uses a BSD-style license.

    Testing Tools
    CppUnit
    CppUnit is probably the most well known unit testing frameworks available for C++. CppUnit is licensed under the GPL. I have found it easy to setup and use even though you need a few macro statements to write even an empty unit test. For a thorough review of the unit tests available I refer you to a post by Noel Llopis posted a few years ago (2004) but still very relevant. After reading Noel's post I stuck with CppUnit as it offers most C++-like experience which most developers programming Pro/Toolkit are comfortable with, though I would love to have some time to study Boost.Test since I love the Boost libraries.

    CeeFIT

    I mentioned FIT with my last post and CeeFIT is the C++ implementation of FIT. The following is just an excerpt from my previous post and is just as relevant in this section:

    FIT stands for "Framework for Integrated Test" and enables developers to place the input data in HTML tables so that it is easy to read (both by Human users and software) and outputs the resulting data back in that same HTML table (with a different file name if you prefer) with colored markup so that it is easy to tell which test passed and which did not. FIT is described as a collaboration tool and I have successfully used it as such, by using those HTML files to contain complete descriptions of functionality of the application being developed and to show current status of development. Make sure you download the right version of the FIT libraries as it comes in various flavors e.g. Java, C++, .NET etc.

    I am unaware of other integrated test tools that are as simple to use as FIT and are Open Source or at the very least free to download and use for personal applications. If you know of any please let me know.
    Database
    SQLite
    I mentioned SQLite also in my last post as an excellent, completely free and easy to use database engine. To use SQLite with C++ you need to use a wrapper and many are listed at SQLite's wrapper page. I have personally used CppSQLite hosted on CodeProject and found it really easy to work with.

    NOTE on Using CppUnit and CeeFIT with Pro/Toolkit applications
    Keep in mind that using CppUnit with Pro/Toolkit applications would require you to run Pro/Engineer in batch mode, which I would definitely advise against as that would slow down your build process and does not quite fit in the realm of unit tests. So you are better off writing functional or integrated tests for your Pro/Toolkit applications.

    To write integrated tests for your Pro/Toolkit application using CeeFIT remain tuned in to my blog. I am working on a workspace that will let you do just that and will post the code if and when I am successful.

    Comments or suggestions?

    Friday, May 02, 2008

    Pro/Toolkit, SolidWorks API Development Tools (C# Episode)

    I follow CAD related blogs often and happened to come by the following interesting post at http://ExtensibleCAD.com. As someone who develops SolidWorks API-based (and Pro/Toolkit) applications I thought I could post a similar list of tools that I use in my applications but have the advantage of being Open Source so that they are available to all with little restriction and that too on Microsoft Windows.

    I develop with both Visual C# and Visual C++ and break down the tools based on the language and the CAD system they can be used with. If you develop for SolidWorks then you can use either Visual C# or Visual C++ (although SolidWorks is pushing C# more than C++). On the other hand with Pro/Toolkit you are somewhat stuck with C++.

    Visual C#
    Logging Tools:
    NLog
    Every good programmer needs a good logging tool. I suggest using NLog. This has to be the simplest logging tool ever. I tried to use log4net by Apache but to be honest it has a learning curve that I did not have time for. The best part of NLog is that by simply modifying a configuration file, you can turn off logging completely without a single change to your source code. (I am sure log4net also allows this or something equally simple). NLog is distributed under the BSD license. If for some reason you don't like NLog or log4net then there are others you can take a stab at.

    Testing Tools:
    NUnit
    Who in this day and age writes code without at least a unit test framework that runs as part of your build process? (not me). Well fortunately NUnit is really easy to use and has a license based on zlib which allows commercial use.

    There are other unit test frameworks if you are unsatisfied with NUnit (some people are) e.g. xUnit.net, MbUnit etc. I have heard great things about MbUnit especially how extensible it is but personally NUnit does the job for me so have not let my eye wander.

    FIT
    FIT stands for "Framework for Integrated Test" and enables developers to place the input data in HTML tables so that it is easy to read (both by Human users and software) and outputs the resulting data back in that same HTML table (with a different file name if you prefer) with colored markup so that it is easy to tell which test passed and which did not. FIT is described as a collaboration tool and I have successfully used it as such, by using those HTML files to contain complete descriptions of functionality of the application being developed and to show current status of development. Make sure you download the right version of the FIT libraries as it comes in various flavors e.g. Java, C++, .NET etc.

    I am unaware of other integrated test tools that are as simple to use as FIT and are Open Source or at the very least free to download and use for personal applications. If you know of any please let me know.

    Database
    SQLite for .NET
    Most developers have heard of SQLite, which is an excellent self-contained database engine. The SQLite code has been dedicated to public domain, so it is free for all uses and does not come in multiple flavors like SQL Server Express. Everything SQLite has to offer you get free and no installation is needed. To use SQLite with .NET I suggest using System.Data.SQLite which has a .NET provider to manipulate SQLite databases. System.Data.SQLite too sits in public domain.

    Language Independent
    TortoiseSVN
    This is a must have tool for all developers at least for those who use Microsoft Windows and don't already use some other version control system.

    NOTE on Unit Testing and CAD API
    Keep in mind that if you want to test functions that call SolidWorks API then you need to run SolidWorks in batch mode if you want it to work. I personally do not suggest unit testing functions that call SolidWorks API as it would slow down the build (referring to local build on developers' machine and not build server) process and in my opinion is not what unit testing is intended to be. Additionally the unit tests would not know how to handle calls to SolidWorks API (if SolidWorks is not running and/or you are not connected to a SolidWorks instance). The idea of mock objects may work but that is beyond the scope of this post and may require the CAD-API developer to get quite involved.

    Instead I would suggest using a functional test framework or even integrated test framework for testing functions that call SolidWorks API. Since most of the time the function or integrated test frameworks do not run as part of the local build (perhaps as part of build server), you could run such tests on functions or your system even if they call SolidWorks API.

    Comments?
    Development Tools that I use with Visual C++ and Pro/Toolkit is coming with my next post. Do leave me a comment if you have a tool that you prefer.

    Thursday, April 10, 2008

    Batch mode SolidWorks

    I saw a post on Google Groups where a user had posted a question (2 years ago) asking how one could open SolidWorks silently viz. no GUI and use SolidWorks APIs to open a part but there was no answer that I could find right of.

    In the same vein as my previous post titled "Batch mode Pro/Engineer" I tried to create a similar workspace for SolidWorks that executes SolidWorks with no GUI but still uses the SolidWorks API to load and query parts or assemblies. Fortunately SolidWorks API makes it much easier to do this as compared to Pro/Toolkit. After a little experimentation I came up with the following solution. The solution was created in Visual Studio 2005 using Visual C++. Click on the following zip file to download the solution.


    http://ossandcad.googlecode.com/files/swbatch.zip


    If you prefer to download from the source, you can do so using the following link with your SVN client (e.g. TortoiseSVN (follow the instructions at http://code.google.com/p/ossandcad/source/checkout)):


    https://ossandcad.googlecode.com/svn/trunk/swbatch


    Setup of Solution
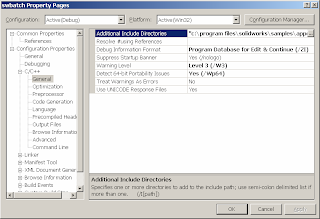
    Simply create a new "Win32 Console Application" project in Visual Studio 2005.


    Edit the project's properties and add the following directory to the "Additional Include Directories" under "Configuration Properties"->C/C++->General:

    "c:\program files\solidworks\samples\appcomm\win32\"


    You should have a "cpp" file named swbatch.cpp (or something similar depending on the name you selected for the console application). Open that file and add the following code to it above the main() (or _tmain()) function.
    #include "iostream"
    #include "objbase.h"
    #include "atlbase.h"

    //Import the SolidWorks type library
    #import "C:\Program Files\SolidWorks\sldworks.tlb" raw_interfaces_only, raw_native_types, no_namespace, named_guids
    //Import the SolidWorks constant type library
    #import "C:\Program Files\SolidWorks\swconst.tlb" raw_interfaces_only, raw_native_types, no_namespace, named_guids
    Then modify your main() (or _tmain()) function to look like the source code included in the zip file. I apologize for not posting the code directly into the body of this post, but Blogger was messing up the formatting.

    Make the following changes to the code in main():

    • Make sure you have a SLDPRT file in the location stated above instead of "C:\\swbatch\\Debug\\camtest.sldprt". Change the path to which sFileName points to, to coincide with your true path.
    Build the solution and execute it. The console application will startup and silently load SolidWorks. If you have Windows Task Manager open then you will see SLDWORKS.exe running. If the SLDPRT is found in the right location, then the code above reads the SLDPRT and throws a MessageBox with the name of the first feature of the SLDPRT, which in this case is "Annotations". After the program exits, SolidWorks exits too.

    Note:
    Please keep in mind the following points about the code in main() in the zip file
    :
    • I first tried to use OpenDoc6 as follows:


      • swApp->OpenDoc6(L"C:\\cygwin\\home\\ganesh\\downloads\\imagecom\\batch\\camtest.sldprt", swDocPART, swOpenDocOptions_Silent, L"Default", &fileerror, &filewarning, &swModel)
    • By doing that, SolidWorks started up with its GUI and then tried to load the model, which was not what we wanted. Next I tried an old API OpenDocSilent() as follows:


      • swApp->IOpenDocSilent(sFileName, swDocPART, &fileerror, &swModel)
    • This had the required effect of opening SolidWorks silently and loading the model in it.
    • The other big problem I noticed was: IF YOU LOAD A READ-ONLY SLDPRT INTO SOLIDWORKS USING OPENDOCSILENT(), FOR SOME REASON SOLIDWORKS STARTS UP WITH GUI. The only solution I have for this at the present is to not load read-only parts or assemblies.
    If you found this article useful, please let me know. It helps me identify which posts, my readers prefer.

    UPDATE: THE POST WAS UPDATED ON AUGUST 3RD 2009 TO REPLACE THE DOWNLOAD LINK FOR SWBATCH.ZIP. PREVIOUSLY SWBATCH.ZIP WAS SERVED FROM BOX.NET. IT IS NOT BEING SERVED FROM GOOGLECODE.

    Friday, April 04, 2008

    Batch mode Pro/Engineer

    Have any of you tried to start Pro/Engineer in batch mode? I found the following suggestion in Pro/Toolkit documentation tkuse.pdf:

    "To ensure that the Pro/ENGINEER main Graphics Window and Message Window are not displayed, you should use either the command-line option -g:no_graphics (or the configuration file option “graphics NO_GRAPHICS”) to turn off the Pro/ENGINEER graphics."

    So to start Pro/Engineer in batch mode with no graphics try the following with Pro/Engineer Wildfire 3.0. To execute this simply open a command prompt using Windows Start->Run-> Enter "cmd", press OK, enter the following into the command prompt and enter enter.

    "C:\Program Files\proeWildfire 3.0\bin\proe.exe" -g:no_graphics

    To verify if Pro/Engineer started with no GUI simply open Task Manager and look for xtop.exe, which is Pro/Engineer's executable. But since no processing is happening, xtop.exe will quit after a few seconds.

    Why is this important?
    Well if you wanted to perform the same operations on numerous files (part or assembly), then theoretically you could execute Pro/Engineer without GUI from the directory where you have a Pro/Toolkit application installed with a protk.dat registry file and Pro/Engineer will load that Pro/Toolkit application. The application can then perform its functions without needing user interaction. For an example see this link where they use this method but instead of a Pro/Toolkit application they use the "trail" files to script the batch processing. Something similar can be duplicated with a Pro/Toolkit application.

    Why do I mention this?
    As a developer of Pro/Toolkit applications it is very important for me to able to test my program thoroughly with as much automation as possible. By using the batch mode without GUI provided with Pro/Engineer I can create a workspace that tests my application using numerous combinations of input and output without user interaction.

    I plan to write on topics related to integrated test frameworks for Pro/Toolkit applications and batch mode could become an important part of that. Keep following my blog for similar posts.

    Wednesday, March 26, 2008

    HOWTO: Example Pro/Toolkit Application using Visual Studio 2005

    In my previous post titled "Example ProTookit Application using Visual Studio 2005" I received a comment asking to explain how I created the sample workspace (Pro/Toolkit Application using Visual C++ 2005) which can be downloaded by clicking the file below:


    http://ossandcad.googlecode.com/files/ProToolkitVisualCpp.zip


    I should point out that the workspace that is attached above, while it is currently in Visual Studio 2005 format, came initially from Visual Studio 2002 (or known as Visual Studio.NET) and my colleagues and I regularly updated the workspace in current versions of Visual Studio.

    In this post I try and explain the steps I used to create a sample workspace from scratch in Visual Studio 2005 for Pro/Toolkit applications. For more details (although with some mistakes some of which I will list in future posts) refer to "tkuse.pdf" in "C:\Program Files\proeWildfire 3.0\protoolkit".

    I break the process down into following steps:

    Creating the Visual Studio 2005 solution

    The easiest method I know of to create a Pro/Toolkit Application in Visual Studio 2005 (that matches the above workspace) is to start with an Empty Project. Name it "proe" for example.

    Add a file named "main.cpp".

    Add the following code to "main.cpp"

    #include <windows.h>

    #include <protoolkit.h>
    #include <procore.h>

    /** Make sure to call ProToolkitMain passing the arguments passed into main
    */
    extern "C" int main(int argc, char **argv)
    {
    ProToolkitMain(argc, argv);
    return 0;
    }

    /** Required entry point for Pro/Toolkit
    */
    extern "C" int user_initialize()
    {
    MessageBox(NULL, "Pro/Toolkit App", "proe", MB_OK);
    return 0;
    }

    extern "C" void user_terminate()
    {
    return;
    }
    Change the "Configuration Type" to "Dynamic Library (.dll)".

    Add the relevant include folders for Pro/Toolkit ("C:\Program Files\proeWildfire 3.0\protoolkit\includes";"C:\Program Files\proeWildfire 3.0\prodevelop\includes").

    Add the following pre-processor definitions (WIN32;NDEBUG;_WINDOWS;_USRDLL;PROE_PROJ_EXPORTS;PRO_MACHINE=29; PRO_OS=4;hypot=_hypot;MSB_LEFT;far=ptc_far;huge=p_huge;near=p_near;_X86_=1)

    Make sure for the Runtime Library you are using "Multi-threaded DLL (/MD)" or the "Multi-threaded Debug DLL (/MDd)" based on whether you are using "Release" or "Debug" configuration respectively.

    Make sure that the "Treat wchar_t as Built-in Type" is set to "No (/Zc:wchar_t-)".


    Add the relevant Pro/Toolkit and Pro/Develop library folders ("C:\Program Files\proeWildfire 3.0\prodevelop\i486_nt\obj";"C:\Program Files\proeWildfire 3.0\protoolkit\i486_nt\obj").

    Add the "Additional Dependencies" (wsock32.lib mpr.lib prodev_dllmd.lib protk_dllmd.lib psapi.lib)

    Do a Rebuild and make sure you have a DLL named "proe.dll" in a sub-folder named Debug or Release depending on your build configuration.

    Creating the Pro/Toolkit application files and message files

    Pro/Engineer loads Pro/Toolkit applications using a registration file named "protk.dat" in the Debug AND Release folder. You need to create a protk.dat file for the Pro/Toolkit DLL that you created using the workspace above. While developing and testing the Pro/Toolkit application I use the following "protk.dat":
    NAME proe
    EXEC_FILE proe1.dll
    TEXT_DIR ..\text
    STARTUP DLL
    allow_stop TRUE
    revision Wildfire
    END

    The "protk.dat" is pretty easy to understand although it would have helped if Pro/Engineer used a more standard method such as the Windows Registry (although that may not work since Pro/Engineer is multi-platform). The main variables you need to be aware of are:
    • TEXT_DIR - The value for this variable is "..\text". This means you need to create a sub-folder named "text" under your main folder. In the "text" folder create a text file named "menu.txt". The "text" folder and the text file "menu.txt" (the name can be changed but I don't delve into that in this post) are Pro/Engineer's bizarre method to enable localization. The "menu.txt" file looks something like the following:
    USER %0s
    %0s
    #
    #
    MenuLabel
    Menu
    #
    #
    PushButton
    PushButton
    #
    #
    It simply lists the label that is seen by the Pro/Toolkit application and its corresponding value. Most Visual C++ developers use either a String Table or other sort of Resource. If you think this is weird, I think it may have something to do with Pro/Engineer supporting multiple Operating Systems.
    • STARTUP - For the example provided the type is "DLL".
    Execute Pro/Engineer and load the Pro/Toolkit Application

    While developing and testing your Pro/Toolkit application I use the following method:
    • Create a shortcut to "C:\Program Files\proeWildfire 3.0\bin\proe.exe" in your Pro/Toolkit's "Debug" or "Release" folder.
    • Make sure the "Start in" text box for this shortcut remains empty which means that this shortcut will start Pro/Engineer in the current folder and will automatically load the DLL specified in protk.dat located in the same folder.
    • Double click the shortcut you created to run Pro/Engineer. If you get a message box with the text "Pro/Toolkit App" then IT WORKED. REJOICE.

    If the method in the above post did not work for you, you can also download the ZIP file I have provided and try that out. If you need more help, post a comment and I will try to provide more information.

    Thursday, February 14, 2008

    Example ProTookit Application using Visual Studio 2005

    PTC has been offering an Application Programming Interface (API) for Pro/Engineer for many years now and I have seen an article or two or three online that shows you how to develop Pro/Toolkit applications using Visual C++. These are very useful and if you navigate to the bottom of the page on article three then you will find a few zip files that you can download and start working with Visual C++ and Pro/Toolkit quickly. There is even a site that sells you tutorials on how to develop Pro/Toolkit applications. Of course I have never purchased any such tutorials so am unable to recommend them.

    Interestingly very little outside help is available on developing Pro/Toolkit Applications using Visual C++. Simply Googling for Pro/Toolkit help is of very very little help. So what is a Pro/Toolkit developer to do?

    In an effort to help other Pro/Toolkit developers who are using Visual C++ 2005 I have attached a zipped workspace created in Visual Studio 2005. This zipped workspace allows you to create a DLL that creates a Menu in the Pro/Engineer interface. Please use this workspace as a starting point - it is not by no means the perfect workspace (for example I currently put the menu.txt in two locations - which is not the most efficient way to do it). This workspace was created and donated by a colleague of mine, Amar Junankar (although I had created a similar workspace and have kept it updated for many years).


    http://ossandcad.googlecode.com/files/ProToolkitVisualCpp.zip


    If you notice carefully in the workspace (after unzipping) in both the "debug" and "release" sub-folders there is a batch file named "Start_ProE_Here.bat". What this batch file does is start Pro/Engineer (default location of "C:\Program Files\proeWildfire 3.0\bin\proe.exe") from the "debug" or "release" (viz. current) sub-folder. This ensures that the protk.dat (which Pro/Engineer uses to register Pro/Toolkit applications) is loaded on startup of Pro/Engineer thus enabling our Pro/Toolkit application. Of course before starting this batch file, please do a build of both debug and release configurations.

    As a side note: In my next post I will add to this workspace the necessary lines of code that will allow a developer to call .NET assemblies from within the Pro/Toolkit Application.

    If you need any help please post a comment and I will try to help as much as I can.

    Monday, February 04, 2008

    .NET in Pro/Toolkit

    Summary: Can we use .NET to develop Pro/Toolkit applications for Pro/Engineer?

    I have seen numerous articles providing tutorials (heres one and another one) on how to develop Pro/Toolkit applications using Visual C++ (either 2003 or 2005). Now the articles refer to developing Pro/Toolkit applications using Visual C++.NET which I think is misleading since the .NET portion refers (I believe) to Managed Visual C++ code while the articles refer to Unmanaged Visual C++ code.

    So this begs the question: how does one develop Pro/Toolkit applications using Visual C++.NET Managed Code and is this even possible?

    The short answer is NO - YOU CANNOT DEVELOP Pro/Toolkit APPLICATIONS USING VISUAL C++.NET MANAGED CODE (or C# or Visual Basic.NET).

    The long answer is PERHAPS - I found a product by ETRAGE LLC named ACI for Pro/Engineer that provides a COM wrapper around Pro/Toolkit functions. Using such a wrapper developers can code Pro/Toolkit applications using pure .NET languages. In fact the product page provides sample code in Visual Basic.NET. This is pretty nice, since if I were to replicate such functionality then I would need to create a DLL (since I could not find a DLL containing Pro/Toolkit functions for Pro/Engineer Wildfire 3.0) that exports the functions in the LIB and mentioned in the header files and then use that DLL in .NET through .NET's Platform Invoke - which is a lot of work - not difficult but a lot of work (major testing would be required). I will try this method out and if it works will post another article with a HowTo.

    But suppose you wanted to merely call functions from .NET classes in your Pro/Toolkit application then there is a simple way to do so using the idea of exposing .NET objects through COM interface. This article on CodeProject provides a great tutorial on how to do just that. Of course you are still developing the Pro/Toolkit application using Visual C++ but now you can consume .NET objects easily.

    An FYI though if you use the method suggested by the CodeProject article - there is a slight slowdown when you call the COM methods (I think the call to CoInitialize is what causes this problem) - so initialize and finalize the COM components once for your application instead of for each method call.

    I will try and post a sample workspace with my next post that shows how to use .NET objects in Pro/Toolkit applications. If anyone has any comments or questions please provide them below I will do my best to answer them.

    Thursday, January 31, 2008

    Register MMS protocol in Firefox

    Update: Surprisingly this post (originally posted in January 2005) still seems alive 3 years after my post. I should warn that I have not tried this method with Firefox versions later than 1.0 and have only tried it on Suse Linux Personal 9.1. If you need help please post a comment and I will try to help. I no longer use Suse and have since moved to Ubuntu (currently using Dapper LTS since I don't have time or need to update often) but will try to help as much as I can. Please see the comments on this post to see if someone has already tried to achieve what you want to.


    Update Oct 20 2010: I received a comment (http://ossandcad.blogspot.com/2005/01/register-mms-protocol-in-firefox.html?showComment=1287565834207#c2838694970893156635) on this post that links to a solution at http://www.murga-linux.com/puppy/viewtopic.php?t=31890&start=343. I have not tried this solution so your mileage may vary.

    MMS stands for Microsoft Media Services and as the Microsoft site says it is a proprietary streaming media protocol. This means that Internet Explorer (IE) has this protocol registered by default but Mozilla Firefox will need some tweaking before it lets you play mms:// streams.

    I have tested this on Mozilla Firefox 1.0 (rpm version = MozillaFirefox-1.0-2.1) on Suse Linux Personal 9.1 and also Fedora Core 3. I believe this method will work on other versions of Mozilla Firefox and Linux OSs but have not tested them. Also the method suggested here is per user alone and not per install. I have included mplayer as the multimedia application that will play the mms:// stream. I assume that you have mplayer installed properly and able to play mms:// streams. You can try other media players but I have not tested others.

    NOTE: Entering values/names/url's should be done without quote marks.

    1. In the URL bar of Firefox type "about:config".
    2. You need to create two new values as follows:
      1. Right click in the Firefox main window, click on "New" and select "String".
      2. In the text box that pops up type "network.protocol-handler.app.mms" for the preference name. Click OK.
      3. For Value enter "/usr/local/bin/gmplayer". This is where my gmplayer is installed. If you have it in a different location, type that in for the value. To find where gmplayer is installed on your computer enter whereis gmplayer in a console. Enter the value that the "whereis" query outputs. Click OK.
      1. Right click in the Firefox main window, click on "New" and select "Boolean".
      2. In the text box that pops up type "network.protocol-handler.external.mms" for the preference name. Click OK.
      3. For value enter "true". Click OK.
    At the end of this process you should have these two new values (type mms in the filter text box in the about:config window)

    - Preference name: network.protocol-handler.app.mms
    Status: user set
    Type: string
    Value: /usr/local/bin/gmplayer

    - Preference name: network.protocol-handler.external.mms
    Status: user set
    Type: boolean
    Value: true

    Now go to a site that provides mms:// streams and test. If this does not work, then I would suggest that you test to see if your default player can play the mms:// streams. Pass the URL of the mms:// stream to mplayer directly using the command line/GUI. If it plays then try a different profile in Mozilla Firefox and see if that works (you can create a new profile by using either the" firefox -P" or the firefox -ProfileManager" commands).